

Step by Step Kitchen Bond Cleaning Guide For Tenants
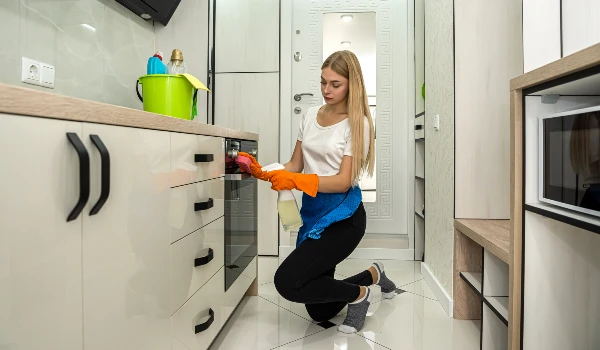
Ever noticed how property managers seem to have a radar for missed grease spots and hidden crumbs? The kitchen is actually the first place they check and the one they check most closely when it comes to bond cleaning. Ovens, sinks and cupboards are high on their list. Even a tiny patch of grease or dust can put part of your bond at risk.
For tenants in Canberra, this makes the kitchen the deal breaker during the inspection. You might have vacuumed every corner of the house, but if the stovetop looks neglected or the fridge smells unpleasant, your landlord will not hesitate to raise concerns. While many tenants turn to quality end of lease cleaning Canberra services, doing it yourself is not impossible.
This article acts as a step by step kitchen bond cleaning guide for tenants. With the right strategy, patience and attention to detail, you can get your kitchen sparkling clean and inspection ready ensuring your bond stays safely in your pocket.
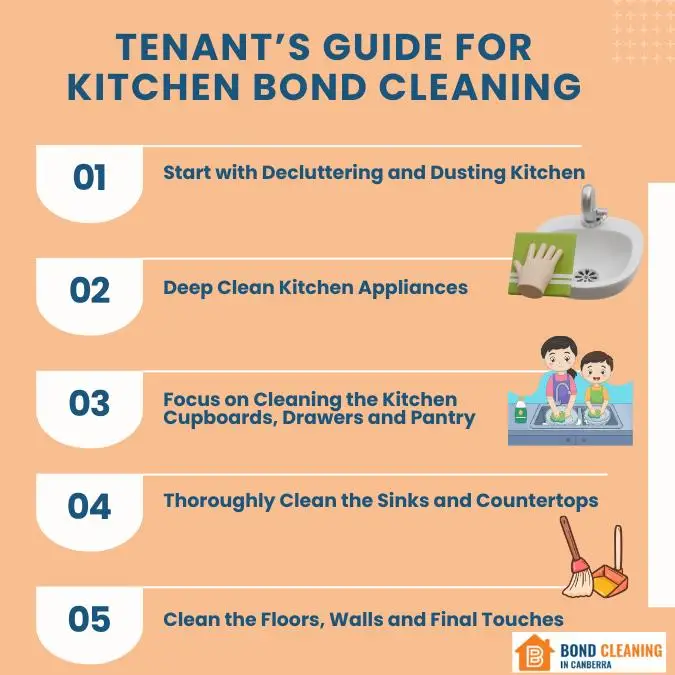
1. Start with Decluttering and Dusting the Kitchen
Before you roll up your sleeves, start by clearing out the kitchen. Empty cupboards, drawers, and pantries of all food items and personal belongings. Remove any portable equipment, such as kettles, toasters and blenders that may be in the way. This not only makes cleaning easier, but it also lets you to reach those neglected nooks and crevices where crumbs and grease tend to lurk.
Once you’ve decluttered, start dusting. Use a microfiber cloth to clean the ceilings, walls, vents, and exhaust fans. Do not forget light fixtures and corners where cobwebs might have gathered. Dusting at the start prevents particles from settling back onto freshly cleaned surfaces later on.
2. Deep Clean Kitchen Appliances
Kitchen appliances are one of the most typical inspection areas during end of lease cleaning Canberra. Property managers usually open ovens, refrigerators, and dishwashers to ensure they have been thoroughly cleaned; therefore, never omit this step.
- Oven and Stovetop:Apply a baking soda paste or oven cleaning solution and let it settle before scraping away stubborn grease. Remove and clean oven racks individually. Grease often accumulates on the stove burners and knobs, so pay attention to them.
- Microwave:Heat a bowl of water with lemon juice for a few minutes to loosen stains, then wipe clean.
- Fridge:Defrost if needed, then scrub shelves, drawers, and seals. A mix of vinegar and warm water works wonders for odours.
- Dishwasher:Run a hot cycle with vinegar, to clear out grime and smells.
3. Focus on Cleaning the Kitchen Cupboards, Drawers and Pantry
Even though cabinets and drawers might appear satisfactory at first, property managers often give them a detailed inspection. Begin by cleaning out the crumbs and dust. Next, use warm soapy water or a mild disinfectant to wipe interiors paying special attention to corners and edges.
Handles and cupboard doors often harbour greasy fingerprints and sticky residues. Here, a diluted vinegar solution or multipurpose cleaner can be useful. For tight spots around hinges or grooves, use an old toothbrush or small cleaning brush. The goal is to leave cupboards looking like they have barely been used.
4. Thoroughly Clean the Sinks and Countertops
The sink is another very common spot for end of lease cleaning Canberra inspections. Mineral deposits, soap scum, and water stains can make it appear neglected. Scrub the sink well with a non abrasive cleaner, then polish with vinegar and a microfiber cloth to achieve a shining finish. Don’t forget to clean, the drain area and taps since dirt commonly lurks there.
Clean countertops with material specific cleansers. Laminate may be cleaned with basic detergents however stone or granite may require specialised cleaning chemicals. Wipe down the edges, grout lines and backsplash areas where food splatters often occur. Leaving things tidy ensures that your kitchen looks clean and well maintained.
5. Clean the Floors, Walls and Final Touches
With the majority of the heavy cleaning completed, it is time to concentrate on the final touches. Sweep and vacuum the kitchen floor first, then mop it with disinfectant solution. Move equipment such as refrigerators or ovens slightly forward if feasible to clean below; inspectors usually peek in these areas.
Next, check walls for splashes, especially near cooking zones. Wipe them down, with a gentle cleaner that will not damage paint. Don’t overlook little details like light switches, power outlets, skirting boards, and door handles. These nuances may appear insignificant, but they mean the difference between a good clean and a superb one.
Infographic: Tenant’s Guide for Kitchen Bond Cleaning
Wrapping Up
Kitchen bond cleaning is one of the most time consuming aspects of moving out, but breaking it down into simple steps makes it much less daunting. Every action, from clearing and dusting to washing appliances and polishing sinks, helps to prepare the kitchen for inspection. With the correct preparation and effort, you can comfortably tackle the kitchen independently while keeping your bond intact.